Batch processing – automatizing the use of GDAL and SAGA GIS tools using Bash Shell scripts
Fellow researchers and open-source GIS enthusiasts,
Welcome to my blog!
I’d like to start with a disclaimer – I may be a researcher of this very area but that doesn’t mean everything I do or write here will work for you, in your own desktop configurations and package versions. I have no responsibility if you lose data or mess up your installation. I also do not authorize any copies of my content.
It has been some time since I introduced you to SAGA GIS Command Line version. One of the advantages of using either SAGA, or any other software, on Command Line Interface (CLI) is the ease to do batch processing. Another GIS software that I commonly use by CLI is GDAL.
So, today I will show how to use a Bourne Again Shell (Bash) script to do batch processing of files, providing an example in which both GDAL and SAGA GIS are employed. There are other ways to do batch processing, e. g. through Python, but I am not going into that today. I am showing you one of the most simple and primitive ways of doing batch geoprocessing, which does not need Python interpretation.
Make sure you can run a Bash script in your machine
One of the simplest yet most tricky ways of doing batch processing is by using Bash scripts. Bash is a type of Shell Script, which means it runs directly on a user interface that accesses the services of an operating system. So, does that mean that a Bash script will run directly in my Command Prompt on Windows? No, it doesn’t.
Windows users
But I currently use Windows and use Bash scripts on it anyway. To achieve this, I installed Git for Windows (https://gitforwindows.org/) that comes with the functionality Git Bash Here. But there are other ways. A popular one is using Windows Subsystem for Linux (https://docs.microsoft.com/pt-br/windows/wsl/install-win10).
On Windows 10, if you have Git for Windows, and if you right-click inside a folder in Windows Explorer, it should show the option “Git Bash Here”. If you click it, a prompt much like an Ubuntu terminal will open, and most Ubuntu terminal commands will work there, too. In case you are not too familiar, some of them are:
ls: list the files in the folder
ls *.sh : list all files with .sh extension
cd .. : go to the folder above
cd name_of_folder : enter folder
./application_name.sh : run this executable
bash ./application_name.sh : run this executable as Bash
rm name_of_file : remove (delete) the file
If you have that working, you can start building your shell script for batch geoprocessing.
Linux users (Ubuntu, Fedora, Debian, etc.)
No actions needed.
Make a test run
Before you build a whole script and find out you actually didn’t need that command, but another one, or that the application you need is not on the path you thought it were, you should first test the commands separately.
Bash scripts run each line separately without “validating” or compiling code, so running each line separately on a terminal (or using Git Bash Here) should have a similar outcome.
Schematize
You probably want to do batch processing because you have a bunch of files to process. Well, just take the first one to another folder to try your commands on this one before generalizing. Schematize which are the commands you will need to run.
Example:
I need the slope based on a Digital Elevation Model (DEM) inside the limits of municipality delimited by a polygon shapefile.
That means I have a large raster that I need to reproject, cut based on a mask vector, and calculate the slope.
To reproject, you can use GDAL Warp tool. To cut it based on a mask vector, you can also use GDAL Warp, with the -cutlines option, if your GDAL is of the newer versions. To calculate the slope angle, you can use SAGA Module Slope, Aspect, Curvature.
However, that is not the best order for the calculations, I am afraid. It would be best to reproject to a projected coordinate system, then, calculate the slope, then, clip by the mask layer. This way, we make sure that the border of the municipality will not have spurious slope values. If the original projection of the DEM is a projected CRS and it is being projected into a geographical (lat long type) system, we should first calculate the slope, to avoid distortions.
The tools that I will need are:
GDAL Warp
SAGA GIS Module Slope, Aspect, Curvature
GDAL Warp (again)
Find the tools on your system or download them
For the example, if you have QGIS, GDAL is usually inside the folder in which QGIS is installed, on the “bin” folder. Find the GDAL tools to be used there.
Enter the folder and check the version of GDAL by typing:
./gdalinfo.exe --version
For reference, mine is:
GDAL 3.1.4, released 2020/10/20
On Windows, SAGA GIS Command Line version is found wherever it was downloaded and unzipped. On Linux, it can be downloaded on the relevant repository or built by the user. I explained how to use SAGA GIS command line interface on a previous post.
For the example, on a Windows computer:
GDAL Warp is gdalwarp.exe inside the QGIS 3.18 bin folder.
SAGA GIS Module Slope, Aspect, Curvature can be called inside the folder in which saga_cmd.exe is, by the command saga_cmd.exe ta_morphometry 0. See more on SAGA-GIS Module Library Documentation.
Build a sample code
Let’s say the original raster is orig_raster.tif and is saved on path_orig_file. Also saved in path_orig_file is municipality_mask.shp
path_gdal is the path where GDAL can be found and path_saga is the path where saga_cmd can be found.
For the example, I would build something like the stated below.
To enter the folder where GDAL is:
cd path_gdal
To run GDAL Warp (check the possible inputs here https://gdal.org/programs/gdalwarp.html)
./gdalwarp -s_srs the_original_CRS -t_srs the_target_CRS -r bilinear path_orig_file/orig_raster.tif path_orig_file/reprojected.tif
Now, we should calculate the slope angle of the generated raster. First, enter the SAGA folder, then, run the command.
cd path_saga
./saga_cmd ta_morphometry 0 -ELEVATION path_orig_file/reprojected.tif -SLOPE path_orig_file/calc_slope.tif -ASPECT delete_this_file_later.tif
Notice that the default unit for slope is radians. To change that to degrees, add the option “-UNIT_SLOPE 1” to the end of the command.
Change back to GDAL path and run GDAL Warp again:
cd path_gdal
./gdalwarp -r bilinear -cutline path_orig_file/municipality_mask.shp -cl municipality_mask -crop_to_cutline path_orig_file/calc_slope.tif path_orig_file/slope_mask.tif
And slope_mask.tif is the file you are looking for in this sample code. Open it in your preferred geoprocessing utility and check that is what you want. If it is, proceed.
Wrap the commands in a Bash loop
Time to wrap this code in a loop for it to be a batch process.
Create the Bash script
Create a new text document, from the notepad. Save it as your_preferred_name.sh
If you are on Windows, start the code with:
#!/bin/bash
So you can call the executable directly on Windows. In Linux, in order to be able to execute your shell script, you will need to alter the permissions of the file to allow it to be executed.
The “#” denotes the start of a comment, in the remaining lines.
A “for” loop on Bash looks like this:
for i in {1..100}
do
	# commands here
done
So, you are doing a loop on the i variable.
To print something on the terminal screen, the command is “echo”. Try this:
for i in {1..2}
do
   echo "---"
   echo "Iteration $i"
   echo "---"
done
And run it by simply calling on the Git Bash Here
./your_script.sh
It should output the iterations 1 and 2 on screen.
---
Iteration 1
---
---
Iteration 2
---
If this goes right, you know you are on the right direction.
Build the names of the files.
Usually, files for batch processing were automatically generated and have all the same name followed by a number, which makes this process easier.
UPDATE (17.09.22): if your files are not named like this, but are all on the same folder, there is a snippet for you on the end of this post.
Based on your previously written script, add the path to your input rasters on the loop:
for i in {1..2}
do
  echo "---"
   echo "Iteration $i"
   echo "---"
   folder_orig="path_orig_file/orig_raster"
   extension=".tif"
   compose="$folder_orig$i$extension"
   echo $compose
done
And see if it prints the path to your input files accordingly. Make adjustments, if needed. For the example, the output is:
---
Iteration 1
---
path_orig_file/orig_raster1.tif
---
Iteration 2
---
path_orig_file/orig_raster2.tif
Add the commands and folder switches
Build the name of the outputs the same you did with the input.
The declarations that do not change can be at the top of your loop:
folder_intermediate="path_orig_file/intermediate/"
file_warp1="warp1_"
file_slope1="slope1_"
file_final="final_"
And the complete paths can be composed inside the loop:
compose="$folder_intermediate$file_warp1$i$extension"
Add it and the geoprocessing commands to your script:
folder_intermediate="path_orig_file/intermediate/"
file_warp1="warp1_"
file_slope1="slope1_"
file_final="final_"
for i in {1..2}
do
   echo "---"
   echo "Iteration $i"
   echo "---"
   folder_orig="path_orig_file/orig_raster"
   extension=".tif"
   path_file_orig="$folder_orig$i$extension"
   path_file_warp="$folder_intermediate$file_warp1$i$extension"
   path_file_slope="$folder_intermediate$file_slope1$i$extension"
   path_file_final="$folder_intermediate$file_final$i$extension"
   #GDAL Warp
   cd path_gdal
   ./gdalwarp -s_srs the_original_CRS -t_srs the_target_CRS -r bilinear $path_file_orig $path_file_warp
   #SAGA Module
   cd path_saga
   # the Aspect file can be overwritten everytime, since we are not using it.
   ./saga_cmd ta_morphometry 0 -ELEVATION $path_file_warp -SLOPE $path_file_slope -ASPECT delete_this_file_later.tif
   # GDAL Warp
   cd path_gdal
   ./gdalwarp -r bilinear -cutline path_orig_file/municipality_mask.shp -cl municipality_mask -crop_to_cutline $path_file_slope $path_file_final
done
Give it a try
Before running the batch process for your 100 (1000?) rasters, run it for your first two. If it runs smoothly, then, run the shell script for the rest of the rasters. Adjust this in the “for” loop range.
To run the script, type on the terminal:
./my_script.sh
Replace my_script by the name you gave to your script.
If it doesn’t work, you can try:
bash my_script.sh
And that is how I do batch processing for geoprocessing CLI applications!
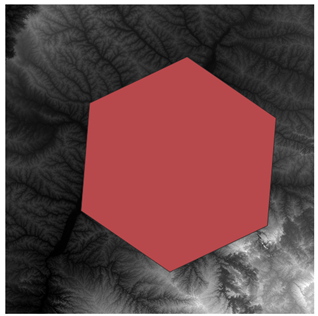
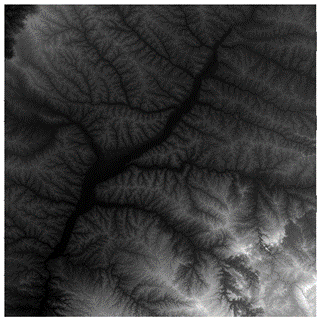
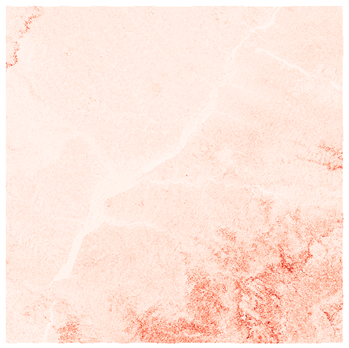
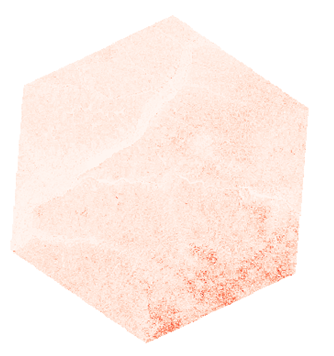
Examples, for the case presented, of how the files should look like in each step of processing
I tested the script sucessfully with elevation data from CIAT-CSI SRTM, a version of the Digital Elevation Model NASA Shuttle Radar Topographic Mission (SRTM) with filled voids. The polygon used was drawn on QGIS.
For the presented example, the original data used was:
After the projection, the DEM does not change significantly:
Slope calculated:
After cutting by mask:
That was the output I got on the terminal:
---
Iteration 17
---
Creating output file that is 5875P x 6281L.
Processing initial.tif [1/1] : 0Using internal nodata values (e.g. -32768) for image initial.tif.
Copying nodata values from source initial.tif to destination results_warp1_17.tif.
...10...20...30...40...50...60...70...80...90...100 - done.
____________________________

   #####   ##   #####    ##
  ###     ###  ##       ###
   ###   # ## ##  #### # ##
    ### ##### ##    # #####
 ##### #   ##  ##### #   ##
____________________________

SAGA Version: 7.9.0 (64 bit)

____________________________
library path: ...
library name: ta_morphometry
library     : ta_morphometry
tool        : Slope, Aspect, Curvature
identifier  : 0
author      : O.Conrad (c) 2001
processors  : 4 [4]
____________________________

loading: results_warp1_17

100%

Parameters


Grid System: 89.069219; 5875x 6281y; 81361.296189x 7229119.462180y
Elevation: results_warp1_17
Slope:
Aspect:
General Curvature: <not set>
Profile Curvature: <not set>
Plan Curvature: <not set>
Tangential Curvature: <not set>
Longitudinal Curvature: <not set>
Cross-Sectional Curvature: <not set>
Minimal Curvature: <not set>
Maximal Curvature: <not set>
Total Curvature: <not set>
Flow Line Curvature: <not set>
Method: 9 parameter 2nd order polynom (Zevenbergen & Thorne 1987)
Unit: radians
Unit: radians


101%Saving grid: results_slope1_17.tif...
Export GeoTIFF


Parameters


Grid System: 89.069219; 5875x 6281y; 81361.296189x 7229119.462180y
Grid(s): 1 object (results_slope1_17)
File: results_slope1_17.tif
Creation Options:

Band 1

100%
100%okay
Saving grid: delete_this_file_later.tif...
Export GeoTIFF


Parameters


Grid System: 89.069219; 5875x 6281y; 81361.296189x 7229119.462180y
Grid(s): 1 object (delete_this_file_later)
File: delete_this_file_later.tif
Creation Options:

Band 1

100%
100%okay
Creating output file that is 3633P x 4339L.
Processing results_slope1_17.tif [1/1] : 0Using internal nodata values (e.g. -99999) for image results_slope1_17.tif.
Copying nodata values from source results_slope1_17.tif to destination results_final_17.tif.
...10...20...30...40...50...60...70...80...90...100 - done.
Extras:
- Why not to use Python?
If you are familiar with Python and prefer to use it, sure, you can! However, the goal of my post today is to show you how to do batch processing with Bash scripts!
- I have a part of Python code I need to run, but I would like to do batch processing with Bash, is it possible?
Yes, it is possible! You can call your custom Python code by calling it as you would in the terminal:
python filename.py argument1 argument2
Your Python code file should define actions for when the file is called. You can do this by inserting this snippet to the end of your Python file:
if __name__ == '__main__':
    functionname(sys.argv[1], sys.argv[2])
remember to add to the beggining of your file:
import sys
- Okay, I generated 200+ files. How can I open them all in QGIS?
I wrote a post about it just last week! In it, I explain how I open a lot of files at the same time using Python Console on QGIS 3.18. Check it out.
- Can I delete the intermediate files automatically within the script?
Yes, you can! Sometimes batch processing can take up a lot of disk space with the auxiliary files. Delete them as you would do in a regular terminal but use the variables of their names, inside the loop, after you have used them.
rm $path_file_warp
rm $path_file_slope
- UPDATE (17.09.22) If my files are not numbered, and their names do not follow a simple pattern, can I still do batch processing using Bash?
Yes, you can! Are your files all in the same folder?
If yes, you can first list the files using ls and then do the for loop within the list of files.
Example (based on this Stack Overflow answer):
folder_intermediate="D:/.../intermediate/"
file_warp1="warp1_"
yourfilenames=`ls *.tif`
count=1
for entry in $yourfilenames
do
   echo "---"
   echo "Iteration $count"
   echo "---"
   echo $entry
   folder_orig="D:/..."
   extension=".tif"
   path_file_orig="$folder_orig$entry"
   path_file_warp="$folder_intermediate$file_warp1$count$extension"
   count=`expr $count + 1`
   #GDAL Warp
   cd  path_gdal
   ./gdalwarp -s_srs the_original_CRS -t_srs the_target_CRS -r bilinear $path_file_orig $path_file_warp
done
I also added a counter so that the output files have different names and do not overwrite the previous ones at each iteration.
Luísa Vieira Lucchese
Research Assistant Professor
Research Assistant Professor at University of Pittsburgh