How to read grib2 raster data on Python
Fellow researchers and open-source GIS enthusiasts,
Welcome to my blog!
I’d like to start with a disclaimer – I may be a researcher of this very area but that doesn’t mean everything I do or write here will work for you, in your own desktop configurations and package versions. I have no responsibility if you lose data or mess up your installation. I also do not authorize any copies of my content.
This week I’m going to discuss opening and working with GRIB type georeferenced raster data, with .grib2 extension.
In this post, I will open the grib2 file, read the data from the right band of it, and read its CRS and geotransform.
To open the GRIB, I will use pygrib. For the CRS and transform, I will use, at least, rasterio and GDAL. In this post, I showed how to open, edit, and save .tif files with rasterio, and in this one, I showed a bit about the powerful GDAL Translate tool.
What is GRIB?
Gridded Binary (GRIB) is a data format commonly used in meteorology to store historical and forecast weather data. It is the format suggested by the World Meteorological Organization (WMO).
GRIB data can either be GRIB 1 or GRIB 2, one of the main differences is the compression used for the rasters, GRIB2 files are lighter than GRIB1.
Where can I find GRIB data?
I have seen GRIB data being used in for two or three datasets, but the one I can recall the most is MERGE Remote Sensing precipitation product by INPE.
How can I open GRIB files outside of Python?
I usually open grib2 files first on QGIS (I am using the version 3.16.9), that will open them without an issue.
And how can I open GRIB or GRIB2 files using Python?
I use pygrib to open the files. In their documentation, they point to two ways to install pygrib, using pip or using conda. However, I could only make it work using conda. Run this in your Anaconda Prompt to install pygrib:
conda install -c conda-forge pygrib
The dependencies will be installed by conda too. Now, in your python script, import the pygrib package.
import pygrib
The first thing you need to do is to open the file
openpath=<path to file>
gribfile = pygrib.open(openpath)
If you did not open the file with another software such as QGIS, you may want to know what is in each band of the raster. Pygrib documentation presents a simple way to show the titles of all bands:
grbs.seek(0)
for grb in grbs:
    print(grb)
This will generate an output like this:
1:Precipitation:kg m**-2 (instant):regular_ll:surface:level 0:fcst time 0 hrs:from 200006021200
2:Pressure reduced to MSL:Pa (instant):regular_ll:surface:level 0:fcst time 0 hrs:from 200006021200
Based on this output, I can choose which band I would like to read. In case, the Precipitation one. Based on this, I type the following:
selected_grb = grbs.select(name='Precipitation')[0]
To select the data and acquire the latitude and longitude information from the file:
data_actual, lats, lons = selected_grb.data()
If I call the type of data_actual
type(data_actual)
this is shown:
numpy.ndarray
showing that it is a ndarray. I can use this array right away, make operations with it, etc.
Some grib files open as a masked array. A masked array has the data in one array, and a mask array on other. The mask is usually used to show which grid points are valid. If this happens, load the module to work with masked arrays:
import numpy.ma as ma
and an extra step to extract the data is needed:
data_extract=ma.getdata(data_actual, subok=True)
To extract the mask of the masked array.
mask_extract=ma.getmask(data_actual)
How do I know the CRS of a grib file?
There is a way to do this inside your script using pure Python and Python packages, but I could not do it due to incompatibilities between some packages that were already installed in my conda base environment. I had to run this in a separate Python environment. I will list both options anyway.
There is also a way to know the CRS without using Python at all, in geoprocessing software.
To do this on QGIS (it can either be your first or last resort depending on how acquainted you are with GIS), jump to “Option 3: open the raster on QGIS (or your preferred GIS software)”.
Use GDAL on Python to transform grib2 into GeoTIFF
To do this on Python, keep reading, there is the golden standard solution and the common workaround.
Option 1: if you can install OSGEO package in your preferred environment
If you manage to install OSGEO Python package in the same environment you are running the rest of your script, you may be able to see the CRS within the same code. That would be ideal.
To install the package:
conda install -c conda-forge gdal
If that is the case, run:
from osgeo import gdal
arq1 = gdal.Open (‘gribfile.grib2’)
GT_entrada = arq1.GetGeoTransform()
print(GT_entrada)
the Geotransform will be printed in the screen (it is also saved on the variable “GT_entrada”).
Additionally, save a tif version of the file. To do this, simply run
save_arq = gdal.Translate('tif_file.tif’,arq1)
use rasterio to read the tif file and print the CRS.
with rasterio.open(‘tif_file.tif’) as tiffile:
    print(tiffile.crs)
Option 2: in case there are incompatibilities installing the GDAL package
Create a different environment just to install the GDAL package. I did this directly on the Anaconda Powershell Prompt.
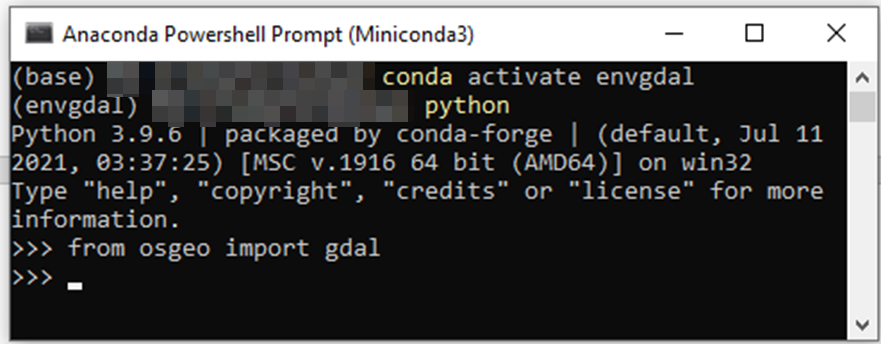
conda create --name envgdal
Enter the environment
conda activate envgdal
Install GDAL package
conda install -c conda-forge gdal
Enter the python console simply by typing
python
And run the GDAL part directly from this window.
from osgeo import gdal
arq1 = gdal.Open (‘gribfile.grib2’)
GT_entrada = arq1.GetGeoTransform()
print(GT_entrada)
save_arq = gdal.Translate('tif_file.tif’,arq1)
I suggest not running rasterio with GDAL. Execute the rasterio part on another conda environment.
Option 3: open the raster on QGIS (or your preferred GIS software)
Make sure you have QGIS installed.
Open the raster on QGIS, then, open the Information panel and check the CRS of the layer. I will do this on QGIS 3.16.9.
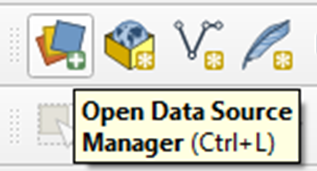
Open the raster file. To do so, click the Data Source Manager.
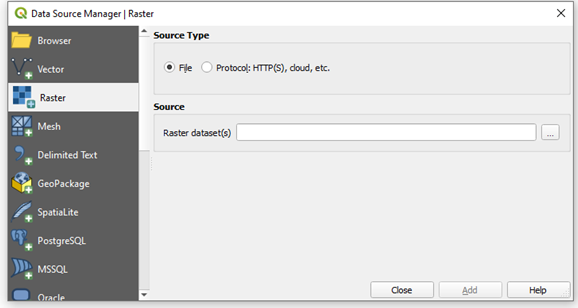
Click the Raster option on the left bar. Select your grib2 file, click Add and then Close.
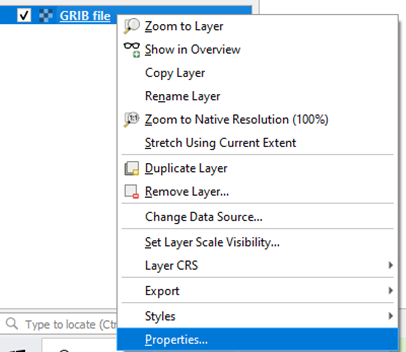
On the layers panel, right-click the layer and click Properties.
Click on Information on the left bar.
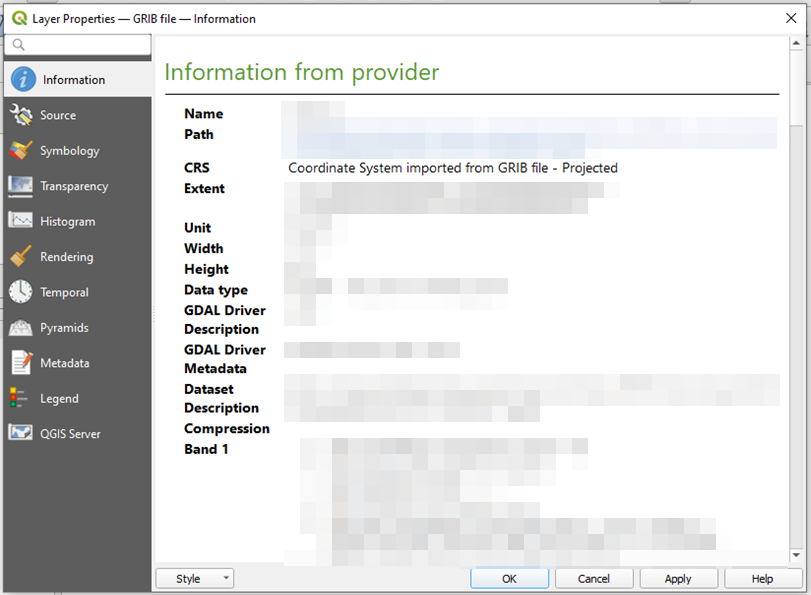
It shows the CRS of the file. In case you don’t find the information you wanted, you can:
Project the raster into a different CRS. In this case, QGIS will perform the adequate projection. Do this by using Warp (reproject) tool.
Save the grib2 file as a tiff file on QGIS and then open it on rasterio. To do so, right-click the layer, select the option Export, Save As.
Extras:
- What if I want an alternative way to translate my GRIB file into .tif?
Another option would be a simple bash script using GDAL executables. I showed how to code your own GDAL shell scripts on this post.
Luísa Vieira Lucchese
Research Assistant Professor
Research Assistant Professor at University of Pittsburgh